Sunday, February 24, 2013

Winter Pinterest challenge

I follow a blog called Young House Love almost religiously, and they are constantly doing Pinterest challenges. You can read about it Here. I have always wanted to submit some of my projects, but usually miss the day that everyone is submitting OR didn't have time to get anything done. So I usually tend to Pinterest challenge myself. Lucky for me I caught the Pinterest challenge two days after the challenge, and decided that was motivation to do one of the many projects I had pinned. Recently I have been pinning decor ideas for D's new room and also knit food for me to attempt to replicate. So I have started two projects and hopefully I will finish both to submit. One project is a knit baked potato. I will be creating a pattern and will post it later. Also a canvas painting with D's birth information.

For the past few weeks I have been on the hunt for ideas for D's future room. It really all began when Target got their 2013 baby stuff out on the shelves. My inspiration was from Mural Max and is an image wrap on a canvas.

Since I found my original plan for a nursery albeit a few months late. I am slowly preparing for D'a future room in the house we will be renting. This means finding or DIY art to put on the walls. After scouring Pinterest I came across this wonderful canvas from (etsy store). I love looking at things on etsy, but since I love to be crafty I look for inspiration instead of buying things.

As it turned out I had purchased a 12X12 canvas to create a hand print canvas, but decided I would find a different canvas for that. After putting my little gumba down for a nap this afternoon I decided to start sketching out and formulating my plan for my canvas. I knew I wanted an animal print but I also knew that the canvas on etsy was far too girly.

After dinner I finished up the sketch and grabbed my grey paint and paintbrush and got to work while my hubby and I caught up on our shows. We managed to fit in 3 shows, we were a few weeks behind, and I got enough done to where I could leave it and let it dry. I probably should have painted the white circle, but I would have hunted down my white paint. That seemed like too much work for the time being.


Day two consisted of painting the center, the yellow circles, adding the dots and all of the baby info.  I am not sure how long it took me because I wasn't able to work on it non stop.  The dots and the giraffe pattern took me the longest. 

I did realize after finishing my project that if I had printed off the text it would have looked sleeker, but that was not the look I wanted.  I used a stencil for his name, and free hand painted the rest.  I can't wait to hang this in his future room.  It is currently hanging above his crib, which is in a corner in my room. Now for the cost break down!
Cost:
Canvas: Had on hand, but I probably paid $5 for the 12x12
Paint: 2 Gray and a Yellow on sale for 3 for a $1. I have a bunch of Michaels gift cards so I only used that to buy the paint.  The white I had on hand since I purchased it back in December for another project.
Paintbrushes: I had on hand
For a grand total of the cost of the canvas $5


I would say this was a very successful project with substantial savings of $46.  
My Winter Pinterest Challenge is Complete!! Check out some of my other projects I created with a pinterest challenge in mind. inexpensive projects

Friday, January 25, 2013

Website Logos

 Another busy day.  I worked on a website for my father to sell fruit labels.  In case you are interested in labels here is the website... www.freewebstore.org/label-warehouse

It will take awhile to get it finished since my father is currently on vacation and I need photo's of the labels to put them up for sale.  I created two logos.  My favorite is the one below but I changed it to a headline and created a different logo.  I will be showing the finished product tomorrow!!

Saturday, January 5, 2013

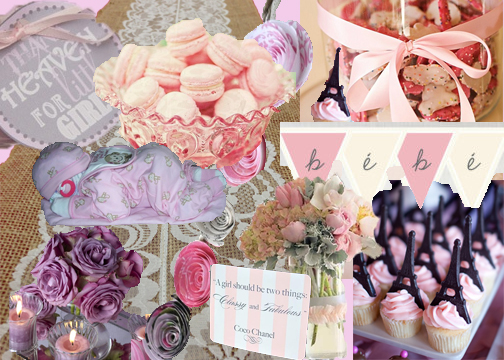
Baby shower inspiration

  For T's baby shower I decided to do a vintage Paris/coco theme.  After looking around pinterest for some images that would work for an adorable shower.  I created this inspiration board and can't wait to get started. I have lots to do in a short amount of time.  I do have a few projects to do including possibly making a table cloth.

Things to Do
- Learn how to make macarons
-Decide on a cupcake recipe
- Make burlap table cloth
-create flower garland
- get Eiffel Tower chocolate mold and grey cupcake liners
-Pick up dollar store mardi gras beads to create pearl necklaces
- Pick up baby girl outfit and receiving blankets
- Print out Bonjour Bebe letters and cute cards
-figure out when to have the shower, hopefully asap since she only had 9 more weeks to go!
 -finish knitting her baby blanket.

Well this is a short post since I have so much to do.
Till next time
-J


Wednesday, January 2, 2013

Tis the Season

It has almost been a year since my last post and while I have completed quite a few projects I ended up having less time.  What I have been doing you might ask?  Well I was cooking and raising a baby.  He is now two and a half months and I am finally starting to have more time for myself.  As it is a new year my goals do in fact include losing weight, do not worry this doesn't include any crazy diets.  Just getting back into my normal exercise routine and possibly adding some running.  Another goal of mine is to dress up every day, there is no reason to sit around in sweats and looking like a mombie.
 As for the blog I now need to change the name to something more family oriented.  I have to admit I was surprised by just how much space a baby can require.  My guest room has transformed into my room/partial storage room.  My closet which was a good size has now been cut in half.  I am still learning some storage organization techniques and utilizing the space I have in my home.

The Christmas Holidays is always my favorite time of year and while it is after the Holidays I still wanted to take a look at my decorations from the past few years. My Christmas decorations have evolved over the last three years.  I did not have a tree for the first couple of years that I moved to Seattle.  Once I got a job and was unable to visit my mom during my school vacations I decided I needed to get a tree.   I got everything including the tree on sale with the exception of the few ornaments that I received as gifts.  

 My favorite about having stairs in the town home was being able to decorate the railing.  I really miss having stairs to decorate and being able to decorate more rooms in the home. 
 Once I moved it became difficult to decorate more than the tree and mantle above the fireplace.  I had always wanted a wreath for the front door but did not want to pay for them!!  One of my Christmas present ideas for the entire family was to create scrabble letter ornaments.  I have a ridiculous obsession with pinterest and many of my projects are inspired by things I have seen on pinterest. 
 The scrabble letter ornaments really fit in with any tree not just mine and are very easy to make.  It only took me a few hours and probably cost me around $10 to make 15 ornaments.  I not only used names but also words such as family, love, and peace.  

 Scrabble Letter Ornaments Items List: 
Scrabble Letters:  Look for old scrabble games at a goodwill or value village.  It is easier to keep an eye out for them since they aren't always easy to find.  I ended up buying scrabble on sale for $7.
Hot Glue gun:  I am a crafter so I have always had this on hand but you can find them at craft stores for about $3.
Cardstock and ribbon. 
I spelled out the names I wanted to use and lined them up on the cardstock.  Using a pencil I drew lines where I needed to cut the cardstock.  After cutting out the cardstock I began with the final letter and worked my way up.  One thing I found was when gluing each letter onto the cardstock it is also important to place glue in between the letters to create a cohesive ornament. Everyone loved them and since I have had requests for more.

My 2012 Christmas Tree has changed a lot since 2010.  I picked up ribbon at the 2011 day after Christmas sale so that I could add it to the tree.  I wanted the tree to look fuller and picked up a couple tips from mi madre. 
                                                       Doty Dynasty Christmas Tree Tips
* Instead of placing the ribbon around the tree place it length wise.  This way you use less ribbon and it
makes the tree look like a present.
*  Place ornaments toward the trunk.  I chose to put the colored balls toward the tree trunk.  This creates more depth.
*  Heavy Ornaments toward the bottom!  This helps keep the tree's overall look balanced.
      -side note:  I look forward to figuring out how to decorate next Christmas with a one year old little boy.
* Add new ornaments every year.  I have a small collection of Christmas ornaments that my mom started for my first Christmas.  I am going to continue this with my little one but they may not always be store bought.  This gives your tree a family look.
*  More than one tree is allowed!  If you have a specific theme you wish to use but also want a family tree pick up another tree for another room in the house if you have space.  If you don't have as much space look into some smaller trees.  I plan on having a small shoe tree next year hopefully with purple lights.  
   -Side Note:  A family friends home is Christmas Wonderland.  They have a tree or two in every room and each tree has a theme.  They even do an ornament exchange.  They hand make ornaments and trade them with a large group.  The creativity involved is just amazing and inspirational.  They even have a UW tree, which my husband decided that he wanted.  We will probably have a UW/WSU tree.  Half purple lights and half red lights, since we are a divided household when it comes to the Huskies and the Cougs.
* Use white lights, unless you have a color theme for your tree.  Lights are often a preference but I have found that colored lights tend to compete with the ornaments that are on the tree.
*  Mix and Match high end ornaments and inexpensive/hand made ones.  A rule to always follow in any situation.  I use this with fashion and home decor constantly, and it helps keep costs down but still gives you the desired look.
* Find some ornaments that represent family vacations.  Whether you go to NYC or just the beach it is usually easy to find an ornament that reminds you of your vacation.  You don't have to find one while on vacation, but make sure to get one the same year.  My mom picked me up the empire state building the year I went to NYC.
* You don't have to spend a fortune.  We all know how expensive ornaments can be, but the reality is you can have nice homemade ornaments and find inexpensive ornaments at places like Target.   
       
 Speaking of homemade ornaments I decided to make poinsettia ornaments out of leftovers from my wreath.  
 
 I cut out and painted too many toilet paper rolls and so I created this lovely ornament for a few family and friends, and of course for myself. I had saved up toilet paper rolls for any upcoming art and came across the wreath.  It is an inexpensive project I just had to spend $1.20 on the red paint.  I had the yarn, cardstock and glue.  I made six of these ornaments and a wreath for $1.20 which even I have to admit is pretty good. 
                                 Tips
* Make sure you paint the toilet paper roll before you cut 1/2" strips because cutting first takes a ton more time.
* Cut the leaves out of green cardstock.  This is where you can get creative.  You can use any kind of green even if it has designs on the paper.
* I used rubber cement to glue them together, but tacky glue or hot glue works just as well.  A normal craft glue stick on the other hand does not work.

 I originally planned on making snowflake ornaments.  I even bought two different kinds of white paint for them.  Unfortunately being a new mom doesn't always leave you enough time to finish all of the projects you have planned.  You never know I may end up doing the snowflakes anyway.  Hopefully I will catch up on some of the projects I have completed over the past year within the next few weeks.  Keep checking back for more projects!
                  ~J

Wednesday, February 29, 2012

A couple inexpensive diy projects


 The invention of pinterest has definitely forced me to complete projects that I have started.  One of the major projects that I did in January was a Rubiks cube tissue cover.  I purchased the kit on etsy and it arrived promptly.
            http://www.etsy.com/listing/90311596/rubiks-rubiks-rubic-cube-tissue-box?ref=v1_other_1
It took me well over seven hours to finish this but it was worth the time.  I made it for my brother who is a huge fan of The Big Bang Theory and once he unwrapped it he was ready to go grab his own rubiks cube.  I am even tempted to make one for myself since it was easy to make.

                                            Chevron Ikea Side Table

       Like many young adults furnishing an apartment on a budget means you have a couple choices from where to furnish your apartment.  These store include the goodwill(or other used goods stores), yard sales, craigslist, ikea or other stores with inexpensive mass produced furniture.  Looking around my apartment you will spot the majority of my furniture was purchased from ikea.  A few downsides to this is I am not the only one I know with the same furniture and if you are like me it's never fun when you walk into your friends apartment and think oh look we have the same coffee table, book case, desk, or kitchen table.  After one of these moments I decided to look into what kind of things I could do to change them so they aren't just another piece of Ikea furniture.  Another thing I have been obsessed with is the chevron pattern.  I really wish that I would have created a stencil instead of using a ruler and tape to measure out the pattern.  There is still time for me to go back and fix it and I will print out a stencil on cardstock when I redo this project.  For now I am happy with my side table.   


                                                Quartrefoil Lamp Shade

What began as a search for the perfect lamp shade changed to finding a lamp shade we could live with and change.  I found the pattern here: http://www.workshopsf.org/?p=614Not only was it the perfect pattern but they also gave great advise of printing it on cardstock. The pattern below was easy enough to create once I grabbed my exacto knife.  I really want to use this pattern again on another piece of furniture but I have not decided which piece.
I had many things to choose from when it came to painting the lamp shade.  I knew what pattern I wanted but originally I wanted the entire shade to have the quartrefoil pattern but because of the three stripes around the bottom of the shade i decided it would look better with stripes.  

The finished lamp shade I am really happy I chose the yellow paint instead of the green because it really pops against the blue wall.  This project only took me about five hours and would have taken less if I didn't repaint two of the stripes several times.  This is my most recent project and I can't wait to find something else to paint. 


                                                       Shoe Book Case
  I have a slightly ridiculous obsession with shoes and I am only allowed to get more shoes if I have a place to store them.  My solution was to create a shoe storage for my pumps and boots since the shoe storage units you can buy don't fit any shoe with a 3" heel.  This project was very simple I bought a 3 shelf bookcase from target, you know the inexpensive ones!  I would have loved the 5 shelf book case but it wouldn't fit in my closet and since I am renting I can not physically change how the closet is set up. Taking inspiration from a few different places I decided to paint the backing the pretty blue color in my living room.  The picture really doesn't do the color justice.  I wish that I could fit more pairs of shoes on this because really 12 pairs is not very much but it will have to do until I have a home that isn't rented.    
I finished this project back in December but I had wanted to wait until i received my christmas present before posting pictures.  Unfortunately the light in my closet is not bright enough and so this picture is the only one that is somewhat decent sorry for the poor quality.  My living room has always lacked light and we only had one lamp at the time of this photo.

I have begun to realize that my home has really transformed in the last 8 months that we have lived here.  When I walk in I don't feel like I am walking into an apartment like I did in my previous residences, but I feel like I am walking into my home.  I have also learned just how much I enjoy layering and using various patterns in the same room.  I have been tempted lately to stencil the quartrefoil pattern on my empty wall in my bedroom.  Using a glossy finish in the same paint color that is on the wall will add a subtle but interesting effect to a wall that doesn't have much going for it. It may be awhile until I do any more decorating in the home but I know some cleaning is going to be taking place very soon. 

Wednesday, September 28, 2011

A year after graduation

Well it's official it has been a year since I graduated and I am still working at the same place before graduation. I have been trying to see the skill set I have learned from this job, but it is hard to know I worked hard at school and am now only working part time. It is interesting the emotions you feel from constantly working on something to having a ton of free time. I have definitely enjoyed relaxing but know it's about time I throw myself out into the real world. Instead of feeling stagnant I want to have something exciting to look forward to. I do want to look into real estate and accounting but I need to find something else to do so I am not stuck at the same job I have had for the past 2 and a half years.

Thursday, September 22, 2011

A month of updates? Not quite

Get ready for a long post since it's been so long since I have posted!
So lately I have been watching a lot of home shows which just makes me excited to go house hunting. We are a long ways away from buying our first home but i definitely enjoy watching home shows and looking at homes for sale. I have always been a well rounded person and always interested in many different things. I usually have multiple projects going all at once. Most of these projects have to do with design or style in some way.
Current Projects
Wedding Blurb Book! Yes I love blurb i have used blurb and mypublisher to create my own photo books. Blurb is by far my favorite although i did get an almost free mypublisher book with one of their coupons. Please alllow me to go off on a tangent since i will do this a lot....Growing up I was a huge scrapbook fan but of course times change and people end up having less time to work on scrapbooks. I have 3 scrapbooks that I am still "working on" I actually doubt I will ever finish them....well maybe if I end up pregnant and stuck on bed rest! So with the beauty of publishing your own book or scrapbook you do not have to pay for all of your photo's to be printed and than for the cost of all of the scrapbook things. Let me tell you the price you pay for the published book is a decent price considering you are still able to work on the book. If there was one complaint for Blurb is that it is better to use if you are looking for a professional type book. If you are looking for a book that has stamps than you should try out mypublisher.
Knitting a baby blanket: I am in the process of knitting a blanket for my hubby's coworker. Of course I found out about the baby shower and decided to knit the blanket a week before the baby shower. The baby shower came and went and I still am not done but thankfully the baby wont be here for a couple months. Hopefully I can finish the blanket soon. A little background info on me I learned how to knit last christmas and taught myself how to do the pearl stitch.
The Guest Room: That's a given considering we still have boxes that need to be gone through. We were fortunate to have my bestie and cousin come and visit which forced us unpack/go through about 10 boxes and somewhat set up the guest room for guests. We only had about 2 days to get everything done and it was amazing the progress that we got done. I unfortunately only snapped a few pics of the cleaning process but to give you all an idea there were boxes lining the wall on the right side about two boxes wide.
I ended up spending the final hours before they arrived hanging up the curtains and adding a few final touches to make them feel more at home.
I read a few tips when it came to decorating a guest room. A few suggestions included getting rid of the personal touches. When decorating a guest room think of what you like about hotel rooms. I made sure the sheets were clean, placed extra pillows and blankets in the room just in case, and hooked up the alarm clock so the guests would know what the time.
There are still plenty that we want to do with the guest room, but for now that project is being put on hold. I am planning on taking the boxes of yard sale stuff out of our place so that will provide some more storage for us.
Fashion: I had been taking a break from the fashion scene for awhile since I was burned out from it after spending six years studying I need a break. So I have been slowly working my way back into the fashion industry. Although I am definitely ready for a new style to emerge since we have seen every decade over the past few years and the years of anything goes is getting old. Over two decades of the same thing and a visit back to the 80's and 70's.
I love the colors for Fall 2011 that were released from Pantone. I am looking forward to finding some pumps in nougat and a cute top in the deep teal. On top of all of these big projects it's also the end of September which means it's time to start decorating for fall. We were very fortunate to have a mild summer up until the first couple of weeks in September. It didn't get warmer than 95 degrees here and I am still hoping that summer wont be over but the clouds are back so I really should get started with decorating for fall. I will be looking for some halloween projects to work on the next couple of weeks and post what I create.